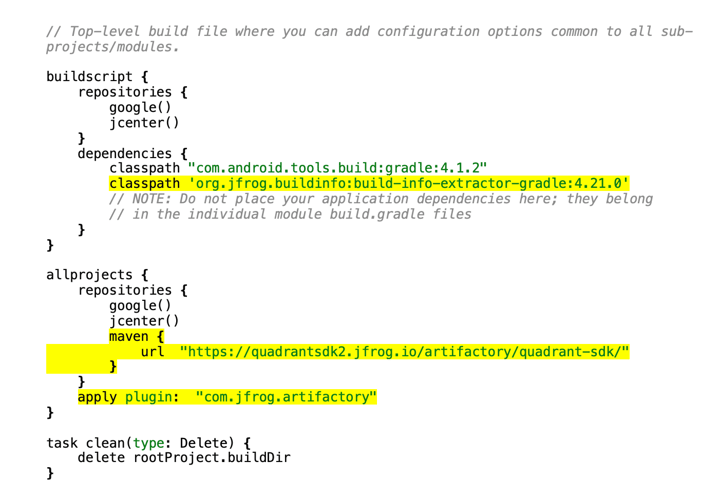
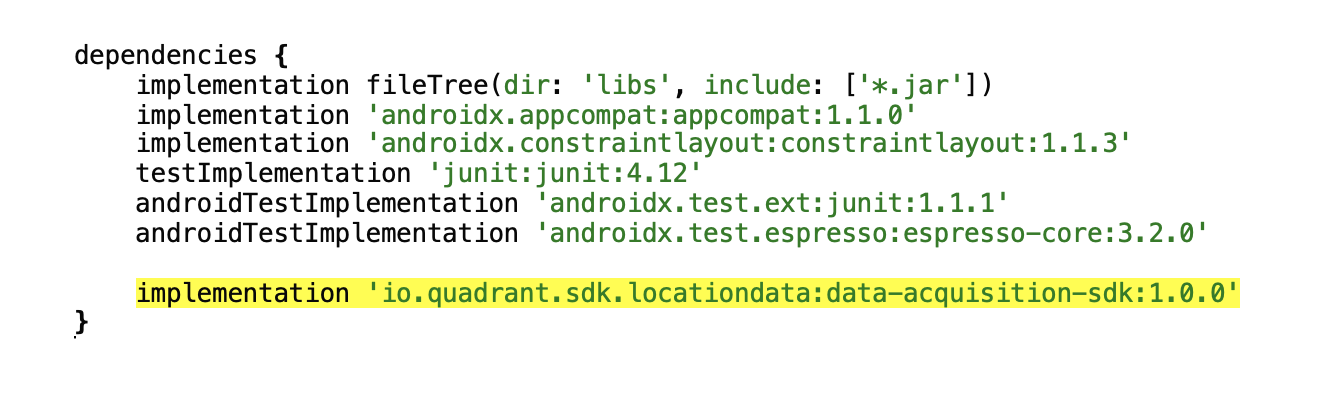
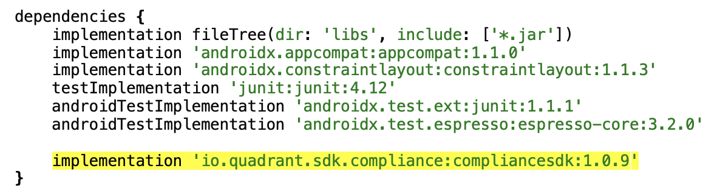
1. Open build.gradle of the app (the app specific level), and add this under 'dependencies' code section (highlighted in yellow):
| implementation 'io.quadrant.sdk.locationdata:data-acquisition-sdk:<latest version>' |
Latest version: 1.0.2
STEP 2 - Sync the gradle files, now let’s try calling the setup method for initiating the monetisation SDK, fill in INTEGRATION_KEY with the integration key fetched from the dashboard.
Thats it!
If you try accessing a method from the library in your code, it should work.
| Client.getInstance().setup(MainActivity.this, true, false, INTEGRATION_KEY, new Client.ResultCallback() { @Override public void onSuccess(String result) { //start location data collection } @Override public void onError(String result) { //add error condition/ alert } }); |
Example:
.png?width=1178&name=Screenshot%202021-06-25%20at%2015.29.58%20(1).png)
| <uses-permission android:name="android.permission.INTERNET"/> <uses-permission android:name="android.permission.ACCESS_FINE_LOCATION"/> <uses-permission android:name="android.permission.ACCESS_COARSE_LOCATION"/> |
And to start collecting, call this method:
| Client.getInstance().startTrackingLocation(); |
Client.getInstance().setup() that we declared before. As shown below: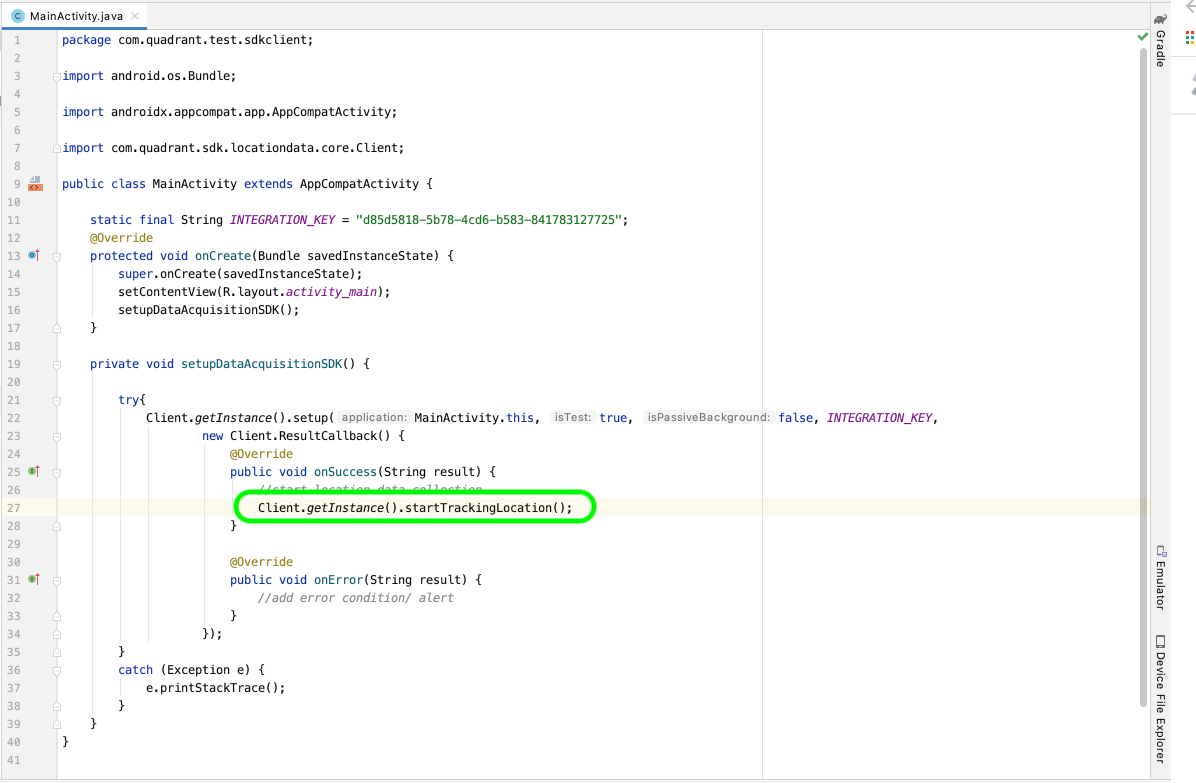
to stop tracking, and reenable tracking, there is a toggle functionality:
| Client.getInstance().toggleStartTrackingLocation(false); |
set the param to false to stop collecting the location tracking, set true to reenable location tracking
Congratulations! You have now configured everything required for location tracking!
implementation 'io.quadrant.sdk.compliance:compliancesdk:<latest version>'Latest version: 1.0.11
multiDexEnabled true 
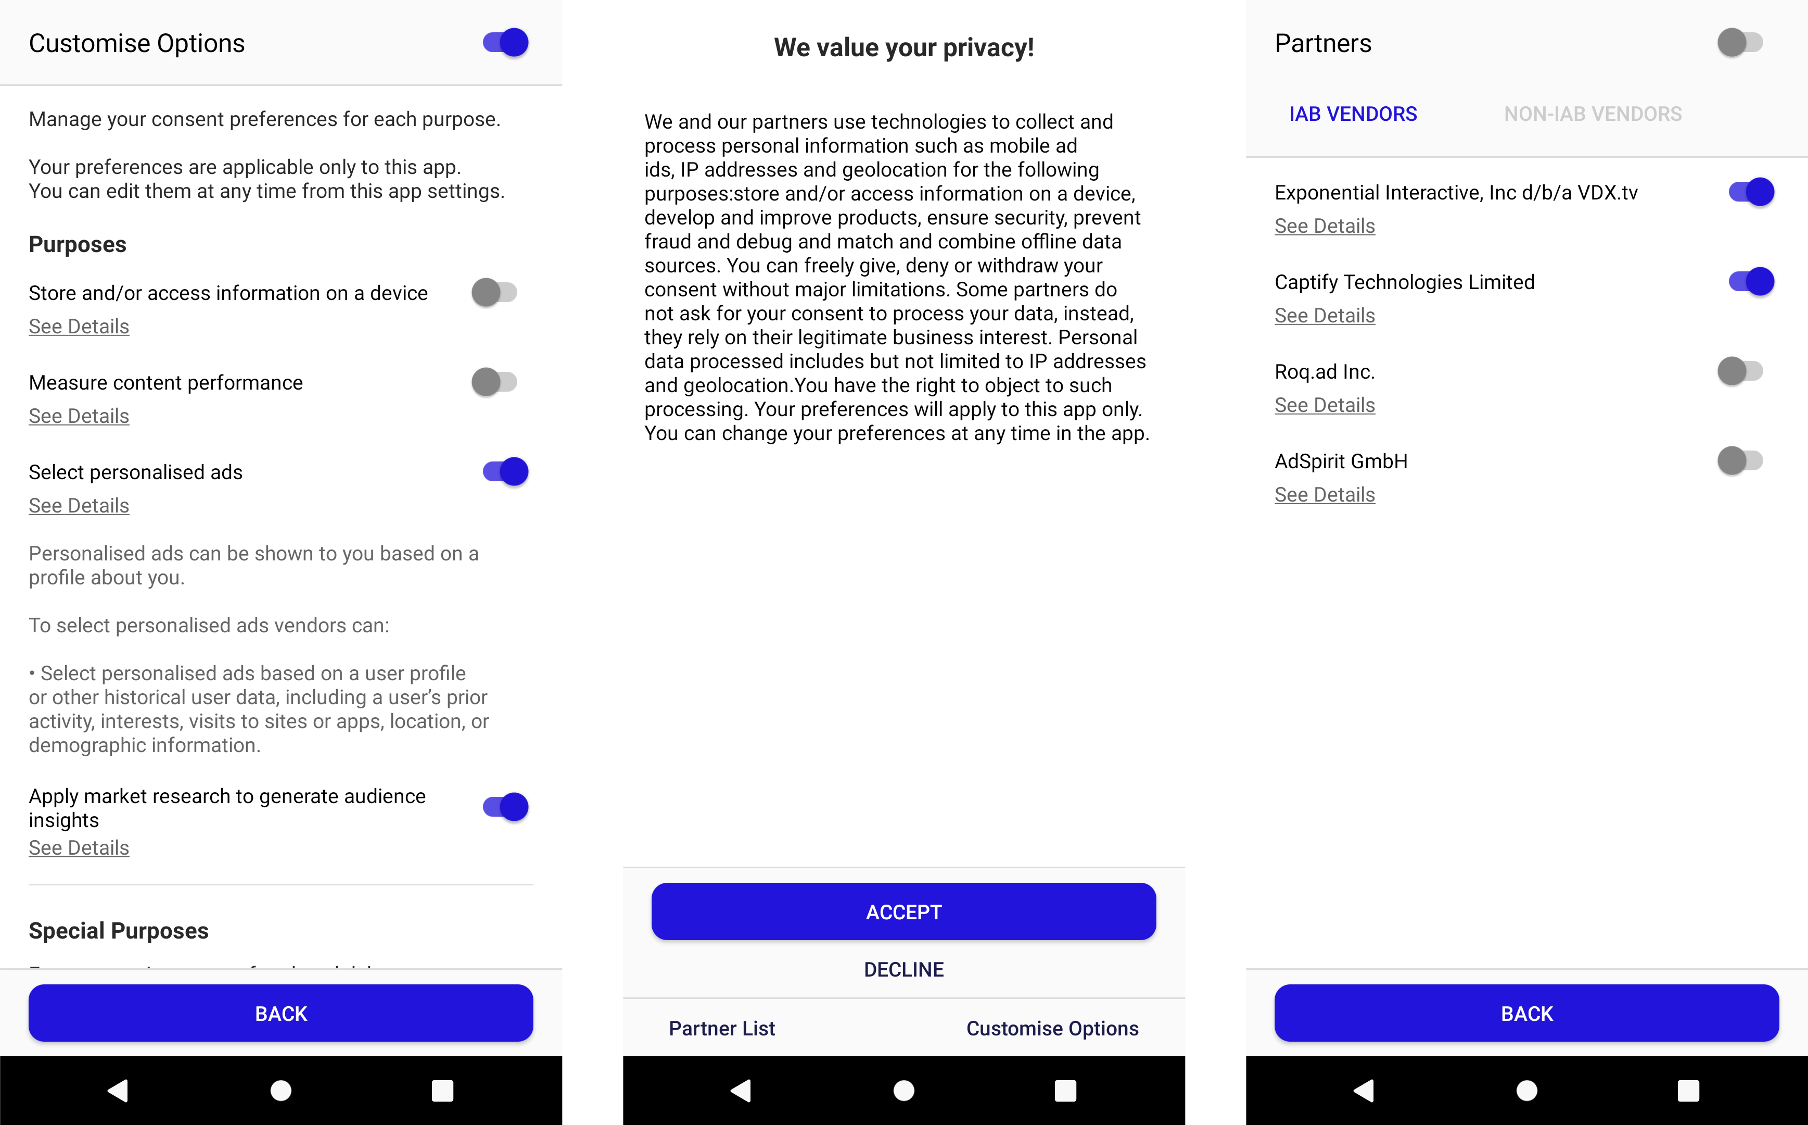
1. private Compliance compliance; 2. compliance Compliance.getInstance(INTEGRATION_KEY);This method will automatically detect which form to show depending on the app user’s position (if they are in Europe they will be shown the GDPR form, if they are in California, they will be shown the CCPA form, in all other cases no form will be displayed):
| 1 | compliance.openConsentFormIfNeeded(this, getSupportFragmentManager()); |
Example:
|
1 2 3 |
if(PermissionUtil.accessLocation(this)){ compliance.openConsentFormIfNeeded(this, getSupportFragmentManager()); } |
and the PermissionUtil class , example will look like similar to this (and for Kotlin it can be slightly adjusted):
| public class PermissionUtil { public static final int PERMISSION_ACCESS_LOCATION = 111; public static boolean accessLocation(Context context){ boolean permission; if(Build.VERSION.SDK_INT >= Build.VERSION_CODES.M){ if(ActivityCompat.checkSelfPermission(context, Manifest.permission.ACCESS_FINE_LOCATION) != PackageManager.PERMISSION_GRANTED){ permission = false; ActivityCompat.requestPermissions((Activity) context, new String[]{Manifest.permission.ACCESS_FINE_LOCATION}, PERMISSION_ACCESS_LOCATION); }else{ permission = true; } }else{ permission = true; } return permission; } } |
GDPR Form:
compliance.openConsentForm(getSupportFragmentManager(),Compliance.GDPR)CCPA Form:
compliance.openConsentForm(getSupportFragmentManager(),Compliance.CCPA)Sample GDPR Form:
After the user accept / consent, the TCF string is stored both in server and the app itself. So basically we can get the stored locally TCF String by calling the function:
1compliance.getTCFString(this); // For GDPR
2compliance.getUSPrivacyString(this);// For CCPA |
with this is the Context of the Activity.
fill in REQUEST_TYPE with below options:
Compliance.REQUEST_OPTOUT
Compliance.REQUEST_DO_NOT_SELL
Compliance.REQUEST_DELETE_DATA → will display a delete request popup form
Compliance.REQUEST_ACCESS_DATA→ will display a request data popup form
compliance.initComplianceRequest(MainActivity.this, MainActivity.this.getSupportFragmentManager(),
      REQUEST_TYPE, new Compliance.ResultCallback(){
      @Override
      public void onSuccess(String result) {
          //to do if request is successful
      }

      @Override
      public void onError(String result) {
         //to do if request is failed/error
      }
  });
Sample Compliance Request (Delete and Request Data form):
.png?width=1195&name=Sample%20Compliance%20Request%20(Delete%20and%20Request%20Data%20form).png)
STEP 1 - Installation using Cocoapods
Add this line in your Podfile:|
|
and then install by type pod install in your command line
Register your integration key after app launch, usually your AppDelegate.swift
import QCMP_SDK to use this framework
Set up your integration key and error handle in didFinishLaunchingWithOptions
import QCMP_SDK GIBB

@UIApplicationMain
class AppDelegate: UIResponder, UIApplicationDelegate {

    let compliance = Compliance.shared
    let integrationKey: String = "your integration key here"

    func application(_ application: UIApplication, didFinishLaunchingWithOptions launchOptions: [UIApplication.LaunchOptionsKey : Any]? = nil) -> Bool {
        compliance.setup(integrationKey)
    }
}Register your integration key after app launch, usually your AppDelegate.swift
import QCMP_SDK to use this framework
You can use openConsentForm(_ complianceType: ComplianceType) to open compliance form based on ComplianceType enum: GDPR or CCPA.
You also can use request compliance action by ComplianceRequest enum: REQUEST_OPTOUT, REQUEST_DO_NOT_SELL, REQUEST_DELETE_DATA or REQUEST_ACCESS_DATA
you can see the example of code below:
import UIKit
import QCMP_SDK

class ViewControllerExample: UIViewController {

    let compliance = Compliance.shared

    @IBAction func openConsentGDPR() {
        compliance.openConsentForm(complianceType: .GDPR)
    }

    @IBAction func openConsentCCPA() {
        compliance.openConsentForm(complianceType: .CCPA)
    }

    @IBAction func requestOptOut() {
        compliance.initComplianceRequest(requestType: .REQUEST_OPTOUT) { [weak self] (result) in
            self?.handleResult(result, "Opt-out data")
        }
    }

    @IBAction func requestDoNotSell() {
        compliance.initComplianceRequest(requestType: .REQUEST_DO_NOT_SELL) { [weak self] (result) in
            self?.handleResult(result, "Do not sell data")
        }
    }

    @IBAction func requestdeleteData() {
        compliance.initComplianceRequest(requestType: .REQUEST_DELETE_DATA) { [weak self] result in
            self?.handleResult(result, "Delete data")
        }
    }

    @IBAction func requestAccessData() {
        compliance.initComplianceRequest(requestType: .REQUEST_ACCESS_DATA) {  [weak self] result in
            self?.handleResult(result, "Access data")
        }
    }

    private func handleResult(_ result: Result<Bool, ComplianceError>, _ operartionName: String) {
        switch result {
        case .success(let isSucceeded):
            if isSucceeded {
                self.showAlert(nil, message: "\(operartionName) succeeded!")
            } else {
                self.showAlert("Error", message: "\(operartionName) failed!")
            }
        case .failure(let error):
            self.showAlert("Error", message: error.message)
        }
    }

    private func showAlert(_ title: String?, message: String) {
        let alertController = UIAlertController(title: title, message: message, preferredStyle: .alert)
        let okAction = UIAlertAction(title: "OK", style: .default, handler: nil)
        alertController.addAction(okAction)
        self.present(alertController, animated: true, completion: nil)
    }
} STEP 1 - Installation using Cocoapods
Add this line in your Podfile:
pod "QDPublisher", :git => 'https://github.com/datastreamx-plc/ios-data-acquisition-sdk.git' |
and then install by type pod install in your command line
Register your integration key after app launch, after that you can setup your event and start tracking location, usually your AppDelegate.swift
|
import QDPublisher |
Implement QDPublisherDelegate - iOS
After setting publisher.delegate = self you need to implement QDPublisherDelegate :
| extension AppDelegate: QDPublisherDelegate { /// this controller used to show alert. func qdPublisherControllreParent() -> UIViewController? { window?.rootViewController } /// you can handle error in this method. func qdPublisherOnError(error: Error) { print(error.localizedDescription) } } |
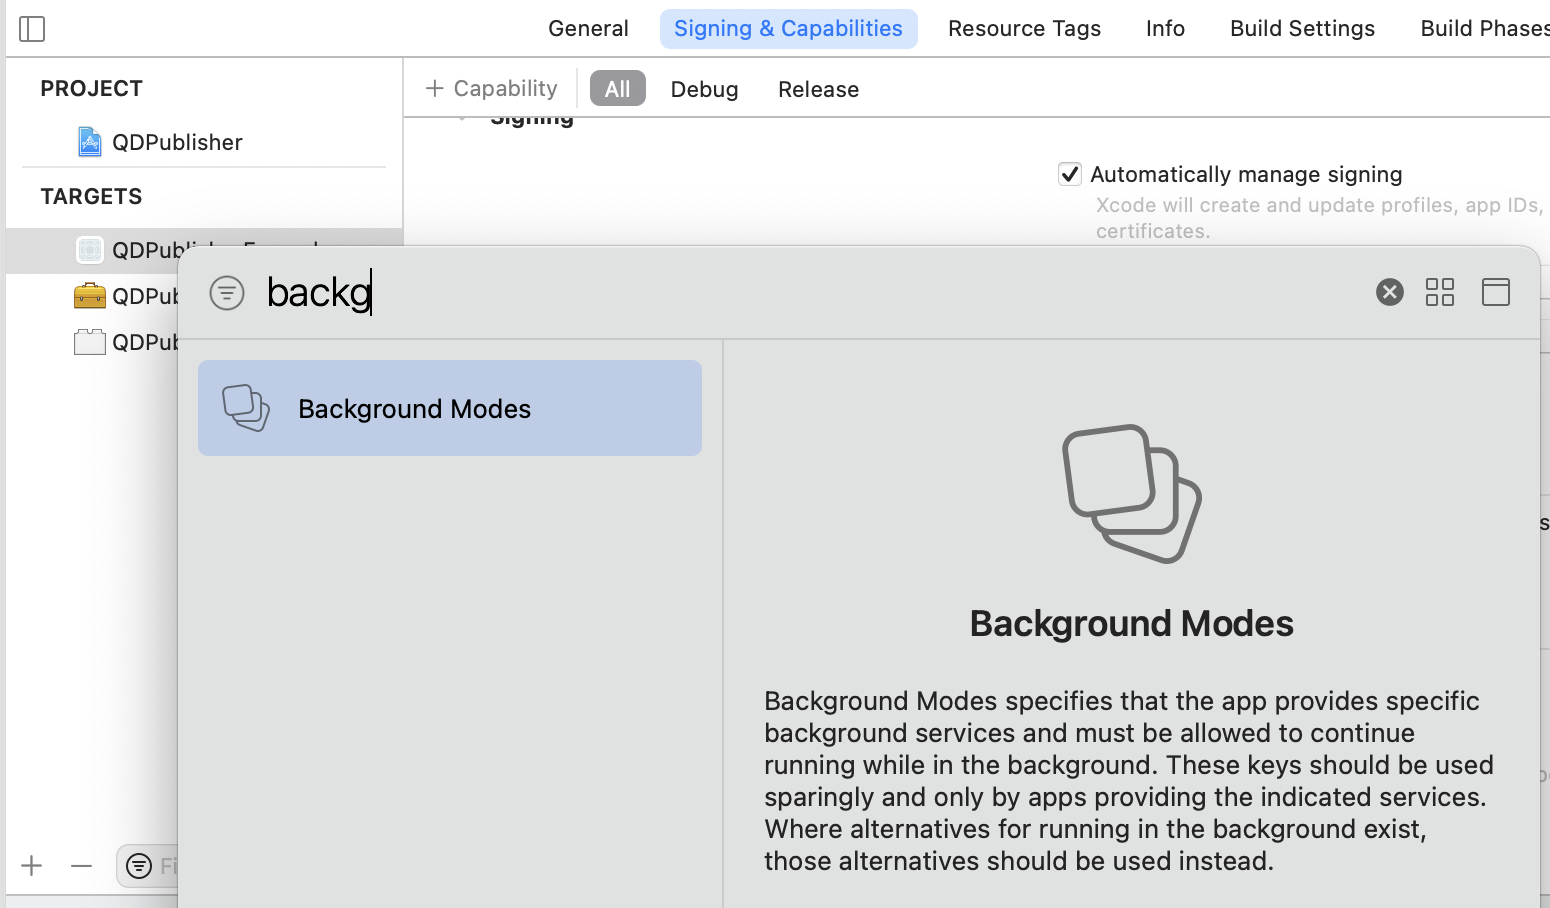
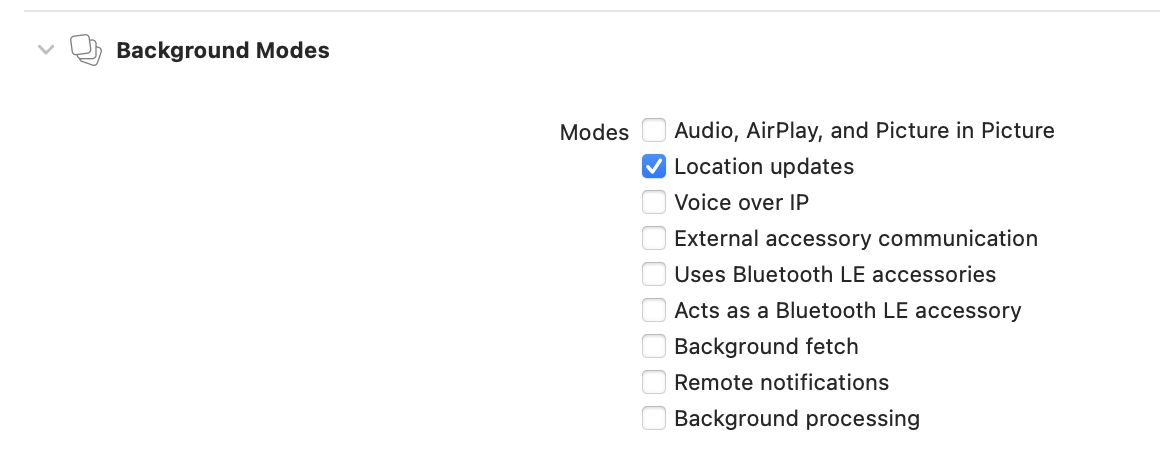
Click your Project
Click Capability
Choose Background Modes
Enable Location updates
See images below:
For location tracking, you can use this code QDPublisher.service.track(choosedLocation) in your location service, it usually looks like this:
| func locationManager(_ manager: CLLocationManager, didUpdateLocations locations: [CLLocation]) { guard let choosedLocation: CLLocation = locations.first else { return } QDPublisher.service.track(choosedLocation) } |